前端一万五 - 设计模式篇
私塾学者 2019-11-17
设计模式
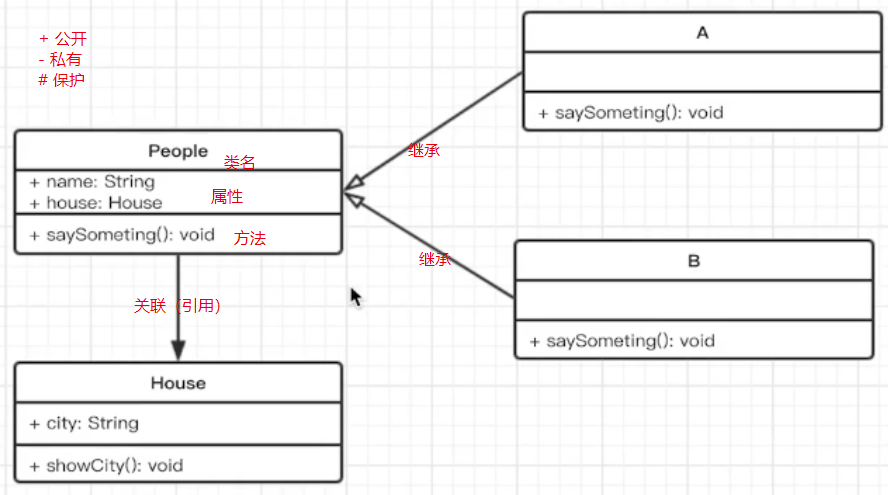
# 面向对象
# 三要素
- 继承
- 父类是公共的,不仅仅服务于一个子类
- 继承可将公共方法抽离出来,提高复用,减少冗余
- 封装 (typescript)
- 减少耦合,不该外露的不外露
- 利于数据、接口的权限管理
- ES6 目前不支持,一般认为
_开头的属性是private
- 多态
- 保持子类的开放性和灵活性
- 面向接口编程
- JS 引用极少,了解即可
# 应用举例
class jQuery {
  constructor(selector) {
    let slice = Array.prototype.slice;
    let dom = slice.call(document.querySelectorAll(selector));
    let len = dom ? dom.length : 0;
    for (let i = 0; i < len; i++) {
      this[i] = dom[i];
    }
    this.length = len;
    this.selector = selector || "";
  }
  append(node) {}
  addClass(name) {}
  html(data) {}
  // 此处省略若干 API
}
window.$ = function(selector) {
  // 工厂模式
  return new jQuery(selector);
};
# UML 类图
# 设计原则
从设计到模式,思考设计模式时候,应该将设计和模式分开
# 何为设计
- 即按照哪一种思路或者标准来实现功能
- 功能相同,可以有不同设计方案来实现
- 伴随着需求增加,设计的作用才能体现出来
《Linux 设计哲学》思考:
- 准则 1:小即是美
- 准则 2:让每个程序只做好一件事
- 准则 3:快速建立原型
- 准则 4:舍弃高效率而取可移植性
- 准则 5:采用纯文本来存储数据
- 准则 6:杆杠效应(可复用)
- 准则 7:避免强制性用户界面
- 准则 8:让每个程序都成为过滤器
- 小准则:允许用户体质环境、尽量使操作系统内核小而轻量化、沉默是金、各部分之和大于整体、寻求 90%的解决方案(二八定律:花 20%的精力解决 80%的需求)
# SOLID 五大设计原则
S:单一职责原则O:开放封闭原则。对拓展开放,对修改封闭;增加需求时,拓展新代码,而非修改已有代码。- L:李氏置换原则。子类能覆盖父类;父类能出现的地方子类就能出现;(JS 中使用较少)
- I:接口独立原则。保持接口的单一独立,避免出现“胖接口”;(JS 中没有接口使用较少)
- D:依赖倒置原则。面向接口编程,依赖与抽象而不依赖于具体;使用方只关注接口而不关注具体类的实现;(JS 中使用较少)
举例:设计 Promise 中,每个 then 中的逻辑只做好一件事(单一职责原则),如果有新需求则拓展 then 的数量(开放封闭原则)
# 23 种设计模式
- 创建型模式
- 工厂模式
- 单例模式
- 原型模式
- 结构型模式
- 适配器模式
- 装饰器模式
- 代理模式
- 外观模式
- 桥接模式
- 组合模式
- 享元模式
- 行为型模式
- 策略模式
- 模板方法模式
- 观察者模式
- 迭代器模式
- 职责连模式
- 命令模式
- 备忘录模式
- 状态模式
- 访问者模式
- 中介者模式
- 解释器模式
# 如何学习设计模式
- 明白每个设计的道理和用意
- 通过经典应用体会它的真正使用场景
- 编码多思考,尽量模仿
# 面试题示例
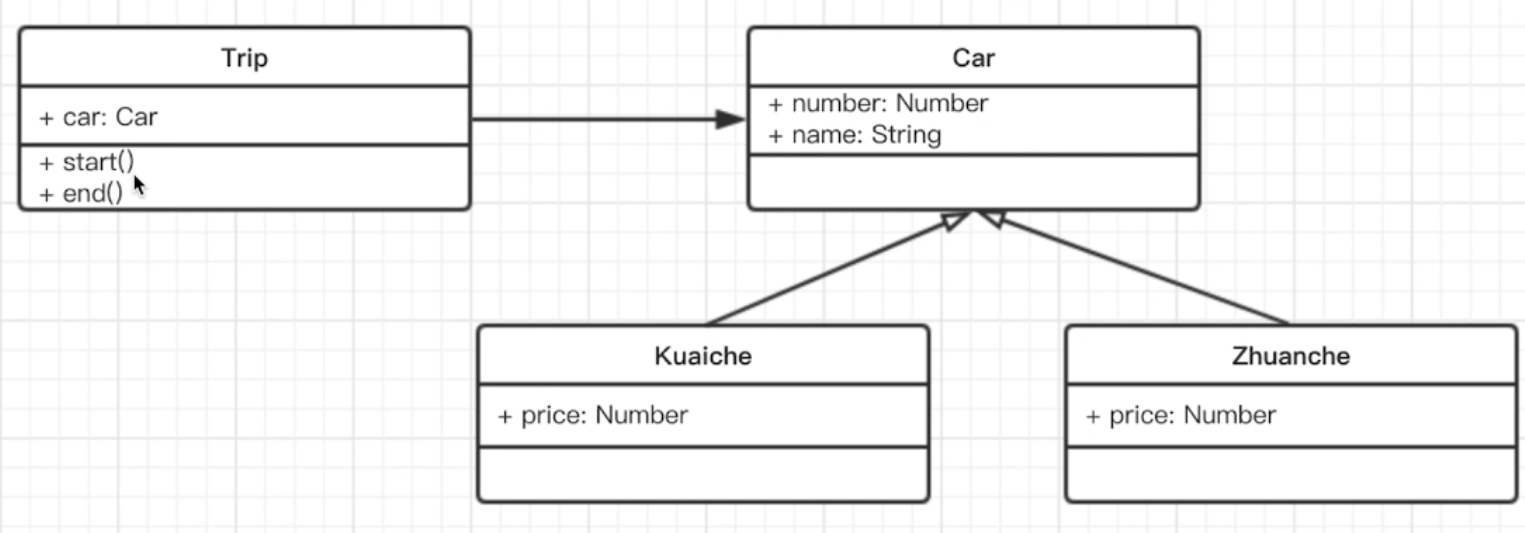
- 打车时,可以打专车或者快车。任何车都有车牌号和名称。不同车价格不同,快车每公里 1 元,专车每公里 2 元。行程开始时,显示车辆信息,行程结束时,显示打车金额(假定行程就 5km)
- 画出 UML 类图
- 用 ES6 语法写出该实例
class Car {
  constructor(number, name) {
    this.number = number;
    this.name = name;
  }
}
class Kuaiche extends Car {
  constructor(number, name) {
    super(number, name);
    this.price = 1;
  }
}
class Zhuanche extends Car {
  constructor(number, name) {
    super(number, name);
    this.price = 2;
  }
}

class Trip {
  constructor(car) {
    this.car = car;
  }
  start() {
    console.log(`行程开始,名称: ${this.car.name}, 车牌号: ${this.car.price}`);
  }
  end() {
    console.log("行程结束,价格: " + this.car.price * 5);
  }
}

let car = new Kuaiche(100, "桑塔纳");
let trip = new Trip(car);
trip.start();
trip.end();
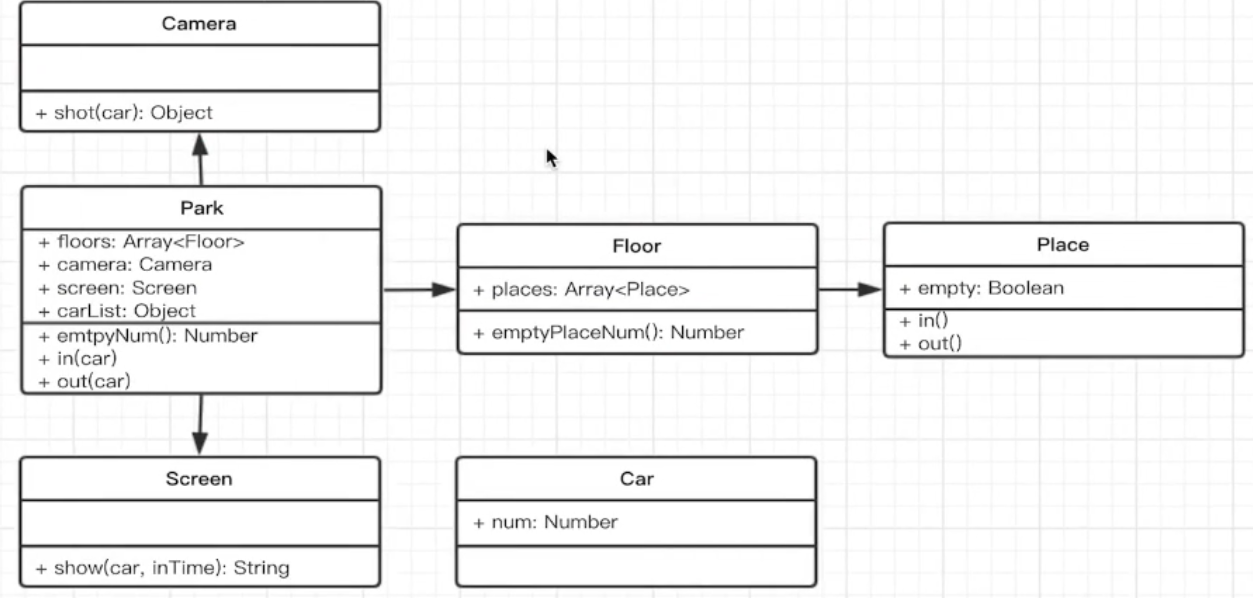
- 某停车场,分 3 层,每层 100 车位。每个车位都能监控到车辆的驶入和离开,车辆进入前,显示每层的空余车位数量;车辆进入时,摄像头可识别车牌号和时间,车辆出来时,出口显示器显示车牌号和停车时长。
- 画出 UML 类图
- ES6 代码
// 车
class Car {
  constructor(num) {
    this.num = num;
  }
}

// 入口摄像头
class Camera {
  shot(car) {
    return {
      num: car.num,
      inTime: Date.now()
    };
  }
}

// 出口显示器
class Screen {
  show(car, inTime) {
    console.log("车牌号", car.num);
    console.log("停车时间", Date.now() - inTime);
  }
}

// 停车场
class Park {
  constructor(floors) {
    this.floors = floors || [];
    this.camera = new Camera();
    this.screen = new Screen();
    this.carList = {};
  }
  in(car) {
    // 获取摄像头的信息:号码 时间
    const info = this.camera.shot(car);
    // 停到某个车位
    const i = parseInt((Math.random() * 100) % 100);
    const place = this.floors[0].places[i];
    place.in();
    info.place = place;
    // 记录信息
    this.carList[car.num] = info;
  }
  out(car) {
    // 获取信息
    const info = this.carList[car.num];
    const place = info.place;
    place.out();

    // 显示时间
    this.screen.show(car, info.inTime);

    // 删除信息存储
    delete this.carList[car.num];
  }
  emptyNum() {
    return this.floors
      .map(floor => {
        return `${floor.index} 层还有 ${floor.emptyPlaceNum()} 个车位`;
      })
      .join("\n");
  }
}

// 层
class Floor {
  constructor(index, places) {
    this.index = index;
    this.places = places || [];
  }
  emptyPlaceNum() {
    let num = 0;
    this.places.forEach(p => {
      if (p.empty) {
        num = num + 1;
      }
    });
    return num;
  }
}

// 车位
class Place {
  constructor() {
    this.empty = true;
  }
  in() {
    this.empty = false;
  }
  out() {
    this.empty = true;
  }
}

// 测试代码------------------------------
// 初始化停车场
const floors = [];
for (let i = 0; i < 3; i++) {
  const places = [];
  for (let j = 0; j < 100; j++) {
    places[j] = new Place();
  }
  floors[i] = new Floor(i + 1, places);
}
const park = new Park(floors);

// 初始化车辆
const car1 = new Car("A1");
const car2 = new Car("A2");
const car3 = new Car("A3");

console.log("第一辆车进入");
console.log(park.emptyNum());
park.in(car1);
console.log("第二辆车进入");
console.log(park.emptyNum());
park.in(car2);
console.log("第一辆车离开");
park.out(car1);
console.log("第二辆车离开");
park.out(car2);

console.log("第三辆车进入");
console.log(park.emptyNum());
park.in(car3);
console.log("第三辆车离开");
park.out(car3);
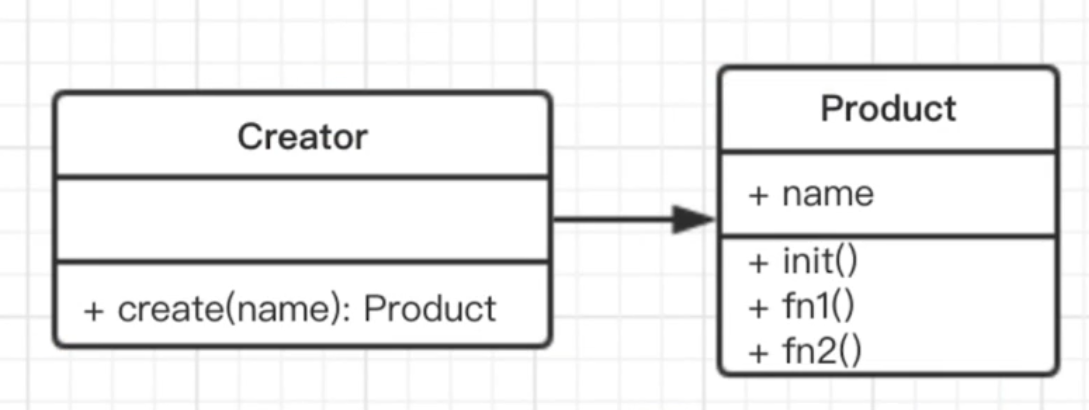
# 工厂模式
- 将 new 操作单独封装
- 遇到 new 时,就要考虑是否该使用工厂模式
# 例子
示例:你去买汉堡,直接点餐、取餐,不会自己亲手做。商店要“封装”做汉堡的工作,做好直接给用户。
# 场景
- Jquery - $('div')
- React.createElement
- VUE 异步组件
- Jquery
$('div') 和 new $('div')有什么区别?
- 书写麻烦,链式操作将成为噩梦
- 一旦 Jquery 名字变化,将是灾难性的
class jQuery {
  constructor(selector) {
    let slice = Array.prototype.slice;
    let dom = slice.call(document.querySelectorAll(selector));
    let len = dom ? dom.length : 0;
    for (let i = 0; i < len; i++) {
      this[i] = dom[i];
    }
    this.length = len;
    this.selector = selector || "";
  }
  append(node) {}
  addClass(name) {}
  html(data) {}
  // 此处省略若干 API
}
window.$ = function(selector) {
  // 工厂模式
  return new jQuery(selector);
};
- React
const profile = (
  <div>
    <img src="avatar.png" class="profile" />
    <h3>{arr.join("-")}</h3>
  </div>
);
jsx 编译之后:
var profile = React.createElement(
  "div",
  null,
  React.createElement("img", { src: "avatar.png", className: "profile" }),
  React.createElement("h3", null, arr.join("-"))
);
class Vnode(tag,attrs,chilren){
  //...省略内部代码。..
}

React.createElement=function(tag,attrs,children){
    return new Vnode(tag,attrs,chilren)
}
- VUE 异步组件
Vue.component('async-example',function (resolve,reject){
  setTimeout(function(){
    resolve({
      template:'<div>I am async!</div>'
    })
  },1000)
})
# 单例模式
- 系统中被唯一使用
- 一个类只有一个实例
# 例子
class SingleObject {
  login() {
    console.log("login...");
  }
}
SingleObject.getInstance = (function() {
  let instance;
  return function() {
    if (!instance) {
      instance = new SingleObject();
    }
    return instance;
  };
})();

// 测试
let obj1 = SingleObject.getInstance();
obj1.login();
let obj2 = SingleObject.getInstance();
obj2.login();
console.log(obj1 === obj2); // true
# 场景
- jquery 只有一个
$ - 模拟登录框
- 其他
- Jquery只有一个
$
if(window.jQuery !== null){
  return window.Jquery
} else {
  // TODO: 初始化
}
- 模拟登录框
class LoginForm {
  constructor() {
    this.state = 'hide'
  }
  show() {
    if (this.state === 'show') {
      alert('已经显示')
      return
    }
    this.state = 'show'
    console.log('登录框已显示')
  }
  hide() {
    if (this.state === 'hide') {
      alert('已经隐藏')
      return
    }
    this.state = 'hide'
    console.log('登录框已隐藏')
  }
}
LoginForm.getInstance = (function() {
  let instance
  return function() {
    if (!instance) {
      instance = new LoginForm()
    }
    return instance
  }
})()

// 一个页面中调用登录框
const login1 = LoginForm.getInstance()
login1.show()
// login1.hide()

// 另一个页面中调用登录框
const login2 = LoginForm.getInstance()
login2.show()

// 两者是否相等
console.log('login1 === login2', login1 === login2)
- 其他
- 购物车
- vuex和redux中的store
# 适配器模式
- 旧接口格式和使用者不兼容
- 中间加一个适配转换接口
# 例子

class Adaptee {
  specificRequest() {
    return '我是原本的插头'
  }
}

class Target {
  constructor() {
    this.adaptee = new Adaptee()
  }

  request() {
    const info = this.adaptee.specificRequest()
    return `${info} - 转换器 - 我才可以用`
  }
}

const target = new Target()
const data = target.request()
console.log(data)
# 场景
- 封装旧接口
- vue computed
- 封装旧接口
// 自己封装的ajax库
ajax({
  url: '/save',
  method: 'POST'
}).done(()=>{})

// 但是由于历史原因,代码中全是
// $.ajax({...})

// 适配器 ↓

var $ = {
  ajax: function(options){
    return ajax(options)
  }
}
- vue computed
<div id="example">
  <p>Original message: "{{ message }}"</p>
  <p>Computed reversed message: "{{ reversedMessage }}"</p>
</div>

var vm = new Vue({
  el: '#example',
  data: {
    message: 'Hello'
  },
  computed: {
    // 计算属性的 getter
    reversedMessage: function () {
      // `this` 指向 vm 实例
      return this.message.split('').reverse().join('')
    }
  }
})
# 装饰器模式
- 为对象添加新功能
- 不改变其原有的结构和功能
# 例子

class Circle {
  draw() {
    console.log('画一个○')
  }
}

class Decorator {
  constructor(circle) {
    this.circle = circle
  }
  draw() {
    this.circle.draw()
    this.setBorder()
  }

  setBorder() {
    console.log('设置一个边框')
  }
}

const circle = new Circle()
circle.draw()

const dec = new Decorator(circle)
dec.draw()
# 场景
- ES7装饰器
- core-decorators
装饰器只能用于类和类的方法,不能用于函数,因为存在函数提升。 ES7装饰器是函数Object.defineProperty()的语法糖
- ES7装饰器 - 装饰类
@testDec
class Demo {

}

function testDec(target){
  target.isDec = true
}

console.log(Demo.isDec)

// --- 装饰器原理

@decorator
class A {}

// 等同于:
class A {}
A = decorator(A) || A
升级版(传参return function) ↓
function testDec(isDec) {
  return function (target){
    target.isDec = isDec
  }
}

@testDec(false)
class Demo {


console.log(Demo.isDec)
}
实例:mixin示例
mixin就是对象继承的一种替代方案,中文译为“混入”(mix in),意为在一个对象之中混入另外一个对象的方法。
function mixins (...list){
  return function (target) {
    Object.assign(target.prototype, ...list)
  }
}

const Foo = {
  foo () { console.log('foo') }
}

@mixins(Foo)
class MyClass {}

const obj = new MyClass()
obj.foo()
- ES7装饰器 - 装饰方法
// Object.defineProperty(obj, prop, descriptor)
function readonly(target, name, descriptor){
  // descriptor对象原来的值如下
  // {
  //   value: specifiedFunction,
  //   enumerable: false,
  //   configurable: true,
  //   writable: true
  // };
  descriptor.writable = false;
  return descriptor;
}

class Person {
  constructor() {
      this.first = 'A'
      this.last = 'B'
  }

  @readonly
  name() { return `${this.first} ${this.last}` }
}

var p = new Person()
console.log(p.name())
p.name = function () {} // 这里会报错,因为 name 是只读属性
function log(target, name, descriptor) {
  var oldValue = descriptor.value;

  descriptor.value = function() {
    console.log(`Calling ${name} with`, arguments);
    return oldValue.apply(this, arguments);
  };

  return descriptor;
}

class Math {
  @log
  add(a, b) {
    return a + b;
  }
}

const math = new Math();
const result = math.add(2, 4);
console.log('result', result);
- core-decorators: 常见装饰器函数
# 代理模式
- 使用者无权访问目标对象
- 中间加代理,通过代理做授权和控制
# 例子

class LoadImg {
  constructor(fileName) {
    this.fileName = fileName
    this.load()
  }
  load() {
    console.log('loading... img: ' + this.fileName)
  }
  show() {
    console.log('show... img: ' + this.fileName)
  }
}

class ProxyImg {
  constructor(fileName) {
    this.realImg = new LoadImg(fileName)
  }
  show() {
    this.realImg.show()
  }
}

const aImg = new ProxyImg('a.png')
aImg.show()
# 场景
- 网页事件代理
- Jquery $.proxy
- ES6 Proxy
- 网页事件代理
<div id="diV1">
  <a href="#">al</a>
  <a href="#">a2</a>
  <a href="#">a3</a>
  <a href="#">a4</a>
  <a href="#">a5</a>
</div>

<script>
var div1 =  document. getElementById('div1')
div1.addEventListener('click' function (e){
 var target = e.target
 if(target. nodeName==='A'){
   alert(target. innerHTML)
 }
})
</script>
- ES6 Proxy
// 明星
const star = {
  name: '张XX',
  age: 25,
  phone: '13910733521'
}

// 经纪人
const agent = new Proxy(star, {
  get: function(target, key) {
    if (key === 'phone') {
      // 返回经纪人自己的手机号
      return '18611112222'
    }
    if (key === 'price') {
      // 明星不报价,经纪人报价
      return 120000
    }
    return target[key]
  },
  set: function(target, key, val) {
    if (key === 'customPrice') {
      if (val < 100000) {
        // 最低 10w
        throw new Error('价格太低')
      } else {
        target[key] = val
        return true
      }
    }
  }
})

// 主办方
console.log(agent.name)
console.log(agent.age)
console.log(agent.phone)
console.log(agent.price)

// 想自己提供报价(砍价,或者高价争抢)
agent.customPrice = 150000
// agent.customPrice = 90000  // 报错:价格太低
console.log('customPrice', agent.customPrice)
# 代理模式 vs 适配器模式
- 适配器模式:提供一个不同的接口(如不同版本的插头)
- 代理模式:提供一模一样的接口
# 代理模式 vs 装饰器模式
- 装饰器模式:拓展功能,原有功能不变且可直接使用
- 代理模式:显示原有功能,但是是经过限制或者阉割之后的
# 外观模式
- 为子系统中的一组接口提供了一个高层接口
- 使用者使用这个高层接口
比如:去医院看病,接待员去挂号、门诊、划价、取药
function bindEvent(elem, type, selector, fn) {
  if(fn === null){
    fn = selector
    selector = null
  }
  // ***********
}

// 调用, 第三个参数可有可无
bindEvent(elem, 'click', '#div1', fn)
bindEvent(elem, 'click', fn)
# 观察者模式(重点)
- 发布 & 订阅
- 一对N
# 例子
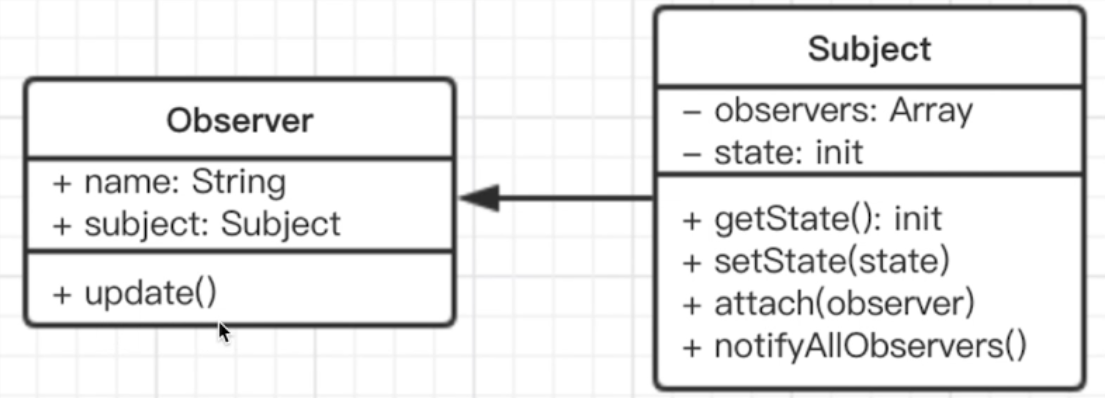
class Subject {
  constructor() {
    this.state = 0
    this.observers = []
  }
  getState() {
    return this.state
  }
  setState(state) {
    this.state = state
    this.notifyAllObservers()
  }
  attach(observer) {
    this.observers.push(observer)
  }
  notifyAllObservers() {
    this.observers.forEach(observer => {
      observer.update()
    })
  }
}

// 观察者,等待被触发
class Observer {
  constructor(name, subject) {
    this.name = name
    this.subject = subject
    this.subject.attach(this)
  }
  update() {
    console.log(`${this.name} update, state: ${this.subject.getState()}`)
  }
}

// 测试代码
const s = new Subject()
const o1 = new Observer('o1', s)
const o2 = new Observer('o2', s)
const o3 = new Observer('o3', s)

s.setState(1)
s.setState(2)
s.setState(3)
# 场景
- 网页事件绑定(监听:订阅,触发-比如点击:发布)
- Promise
- Jquery callbacks
- nodejs 自定义事件
- Promise
promise中的then,相当于订阅,resolve的时候进行发布
/**
 * promise的简易版原生实现
 */
const PENDING = 'pending'
const RESOLVED = 'resolved'
const REJECTED = 'rejected'

function MyPromise(fn) {
  const that = this
  that.state = PENDING
  that.value = null
  that.resolvedCallbacks = []
  that.rejectedCallbacks = []

  /**
   * 5. 执行resolve函数
   * @param {*} value 传入then函数的参数
   */
  function resolve(value) {
    /**
     * 正常执行至此的时候,状态是pending
     */
    if (that.state === PENDING) {
      /**
       * 改变当前promise的状态
       */
      that.state = RESOLVED
      that.value = value
      /**
       * 遍历then函数中push进数组的函数, 并且执行
       */
      that.resolvedCallbacks.map(cb => cb(that.value))
    }
  }

  function reject(value) {
    /**
     * 至此状态已经不对, 所以不会进入条件
     */
    if (that.state === PENDING) {
      that.state = REJECTED
      that.value = value
      that.rejectedCallbacks.map(cb => cb(that.value))
    }
  }

  try {
    /**
     * 1. promise中传入的函数直接执行, 所以是同步方法
     */
    fn(resolve, reject)
  } catch (error) {
    reject(error)
  }
}

MyPromise.prototype.then = function(onFulfilled, onRejected) {
  const that = this
  onFulfilled = typeof onFulfilled === 'function' ? onFulfilled : v => v
  onRejected =
    typeof onRejected === 'function'
      ? onRejected
      : r => {
        throw r
      }
  /**
   * PENDING状态的时候, 将需要执行的函数push进数组保存;
   * 在异步回调之后(resolve或reject执行), promise状态改变
   * --------------
   * 2. 在执行.then函数的时候, promise的状态还是pending
   */
  if (that.state === PENDING) {
    /**
     * 3. push进数组then中传入的函数
     */
    that.resolvedCallbacks.push(onFulfilled)
    that.rejectedCallbacks.push(onRejected)
  }
  if (that.state === RESOLVED) {
    onFulfilled(that.value)
  }
  if (that.state === REJECTED) {
    onRejected(that.value)
  }
}

new MyPromise((resolve, reject) => {
  setTimeout(() => {
    /**
     * 4. 定义好的resolve函数被执行
     */
    resolve(1)

    /**
     * reject函数进入之后, 状态不对了, 所以相当于不会执行传入的reject函数
     */
    reject(2)
    /**
     * 执行完resolve中的下面这行代码还会执行
     */
    console.log('end')
  }, 0)
}).then(value => {
  console.log(value)
})
- nodejs自定义事件
const EventEmitter = require('events').EventEmitter

const emitter1 = new EventEmitter()
emitter1.on('some', () => {
  // 监听 some 事件
  console.log('some event is occured 1')
})
emitter1.on('some', () => {
  // 监听 some 事件
  console.log('some event is occured 2')
})
// 触发 some 事件
emitter1.emit('some')

const emitter = new EventEmitter()
emitter.on('sbowName', name => {
  console.log('event occured ', name)
})
emitter.emit('sbowName', 'zhangsan') // emit 时候可以传递参数过去
const EventEmitter = require('events').EventEmitter

// 任何构造函数都可以继承 EventEmitter 的方法 on emit
class Dog extends EventEmitter {
  constructor(name) {
    super()
    this.name = name
  }
}
var simon = new Dog('simon')
simon.on('bark', function() {
  console.log(this.name, ' barked')
})
setInterval(() => {
  simon.emit('bark')
}, 500)
# 迭代器模式
- 顺序访问一个集合
- 使用者无需知道内部结构(封装)
# 例子
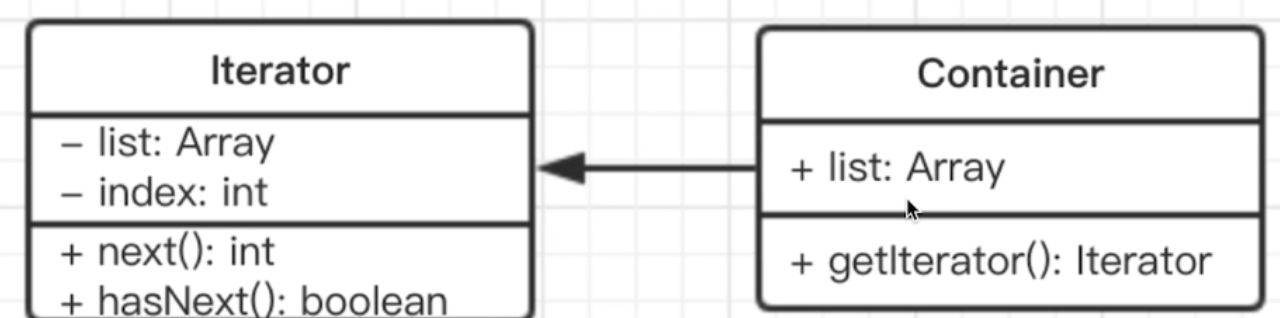
class Iterator {
  constructor(conatiner) {
    this.list = conatiner.list
    this.index = 0
  }
  next() {
    if (this.hasNext()) {
      return this.list[this.index++]
    }
    return null
  }
  hasNext() {
    if (this.index >= this.list.length) {
      return false
    }
    return true
  }
}

class Container {
  constructor(list) {
    this.list = list
  }
  getIterator() {
    return new Iterator(this)
  }
}

// 测试代码
const container = new Container([1, 2, 3, 4, 5])
const iterator = container.getIterator()
while (iterator.hasNext()) {
  console.log(iterator.next())
}
# 场景
- Jquery each
- ES6 Iterator
- Jquery each
function each(){
  var $data = $(data)
  $data.each(function (key, p) {
    console.log(key, p)
  })
}

each(arr)
each(nodeList)
each($p)
- ES6 Iterator
FE有序集合的数据类型:Array、Map、Set、String、TypedArray、arguments、NodeList。(object不属于有序数据集合)
以上数据类型都有[Symbol.iterator],可以通过[TYPE].prototype[Symbol.iterator]来测试
// for - of 遍历原型

function each(data){
  let iterator = data[Symbol.iterator]() // for-of

  // console.log(iterator.next())  // 有数据时返回 {value: 1, done: false}
  // console.log(iterator.next())
  // console.log(iterator.next())
  // console.log(iterator.next())
  // console.log(iterator.next())  // 没有数据时返回 {value: undefined, done: true}

  let item = { done: false }
  while(!item.done){
    item = iterator.next()
    if(!item.done){
      console.log(item.value)
    }
  }
}

// 等同于 ↓
function each(data) {
  for(let item of data){
    console.log(item)
  }
}
- ES6 Iterator 与 Generator
function* helloGenerator() {
  yield 'hello'
  yield 'world'
  return 'end'
}
var hw = helloGenerator()
hw[Symbol.iterator] // function
// Generator函数返回的结果也实现了Iterator接口
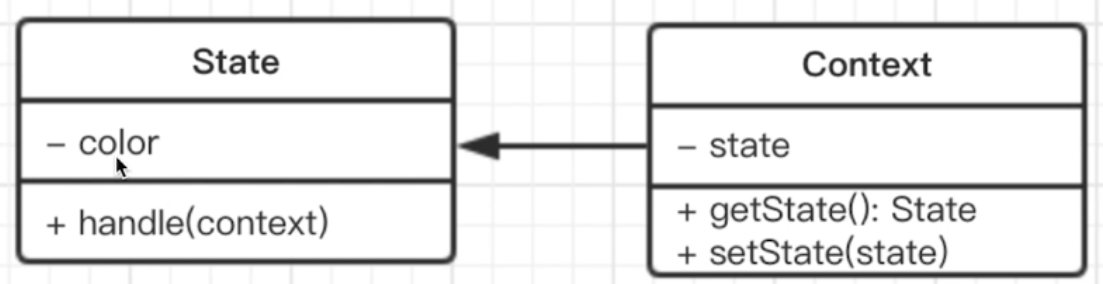
# 状态模式
- 一个对象有状态变化
- 每次状态变化都会触发一个逻辑
- 不能总是用if...else来控制
将状态对象和主题对象分离,状态的变化逻辑单独处理
# 例子
// 状态(红、黄、绿)
class State {
  constructor(color) {
    this.color = color
  }
  handle(context) {
    console.log(`turn to ${this.color} light`)
    context.setState(this)
  }
}

// 主体
class Context {
  constructor() {
    this.state = null
  }
  getState() {
    return this.state
  }
  setState(state) {
    this.state = state
  }
}

const context = new Context()

const green = new State('green')
const yellow = new State('yellow')
const red = new State('red')

green.handle(context)
console.log(context.getState())

yellow.handle(context)
console.log(context.getState())

red.handle(context)
console.log(context.getState())
# 场景
- 有限状态机
- 写一个简单的promise
- 有限状态机
收藏/点赞/关注等业务场景都可以使用状态模式 (状态变化,执行某种操作)
- 写一个promise
import StateMachine from 'javascript-state-machine'

const fsm = new StateMachine({
  init: 'pending',
  transitions: [
    {
      name: 'resolve',
      from: 'pending',
      to: 'fullfilled'
    },
    {
      name: 'reject',
      from: 'pending',
      to: 'rejected'
    }
  ],
  methods: {
    // 监听 resolve
    onResolve: function(state, data) {
      // state - 当前状态机实例; data - fsm.resolve(xxx)传递的参数
       data.successList.forEach(fn => fn())
    },
    onReject: function(state, data) {
      // state - 当前状态机实例; data - fsm.reject(xxx)传递的参数
      data.failList.forEach(fn => fn())
    }
  }
})

// 定义promise

class myPromise {
  constructor(fn){
    this.successList = []
    this.failList = []

    fn(function() {
      fsm.resolve(this)
    }, function() {
      fsm.reject(this)
    })
  }

  then(successFn, failFn) {
    this.successList.push(successFn)
    this.failList.push(failFn)
  }
}

// 测试代码

function loadImg(src) {
  const promise = new myPromise(function(resovle, reject) {
    const img = document.createElement('img')
    img.onload = function() {
      resolve(img)
    }
    img.onerror = function() {
      reject()
    }

    img.src = src
  })
  return promise
}

const src = 'http//*.png'
const result = loadImg(src)

result.then(function() {
  console.log('resolve')
}, function() {
  console.log('reject')
})
# 其他模式
不常用,对应不到经典的应用场景(可能和业务强相关)
- 创建型: 原型模式
- 结构型: 桥接模式、组合模式、享元模式
- 行为型: 策略模式、模板方法模式、职责链模式、命令模式、备忘录模式、中介者模式、访问者模式、解释器模式
# 原型模式
- clone自己,生成一个新对象